Internet connections these days are becoming an integral part of our daily lives. All the time we’re connected with the internet to execute our daily tasks, it may be replying to mail or updating the system. Internet is needed in doing every task.
If you’ve come across the problem of Wi-Fi Keeps Disconnecting on Windows 10, then you’ve landed to the right page. Here I’m going to discuss the step by step process to Fix Wi-Fi Keeps Disconnecting on Windows 10. All the fixes discussed below are pretty quick and easy to implement. So as always without any further ado let’s jump right into the process. ✌️
Contents
1. Change Network Profile
Sometimes Wi-Fi starts disconnecting if the network is marked as Public and instead of Private. So I suggest you change the network profile to Private. Follow the steps below to do the same.
Step 1: Click on the Wi-Fi icon on the taskbar, go to your connected Wi-Fi network and click on Properties.

Step 2: On the next window select the ‘Private’ radio button instead of public.
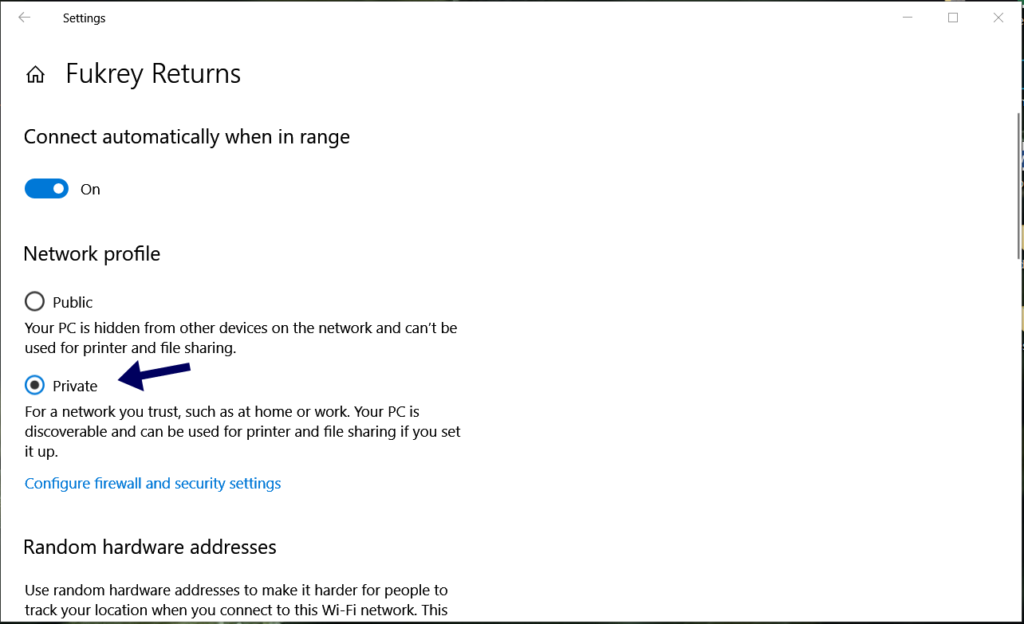
That’s it you are done with changing the network profile. Now try reconnecting the network and check if you can get a consistent connection.
2. Restart/Check Router Connectivity
If your other devices are also facing the same issue of disconnecting from the network, then you can check your router connectivity, it may be the router issue. First, try to reboot your router, and see if this can fix the issue.
3. Check Power Management Settings
If the above steps don’t help you in fixing the Wi-Fi Keeps Disconnecting on Windows 10 issue then you can continue with this method.
If recently you recently made any changes to the Power Management settings or enabled some battery saver or optimization on your Windows 10 system, then it may be the reason behind the Wi-Fi disconnecting in windows 10 issue. Follow the steps to fix it.
Step 1: PressWindows key + X and select device manager, or you can search for ‘device manager’ in the search box.
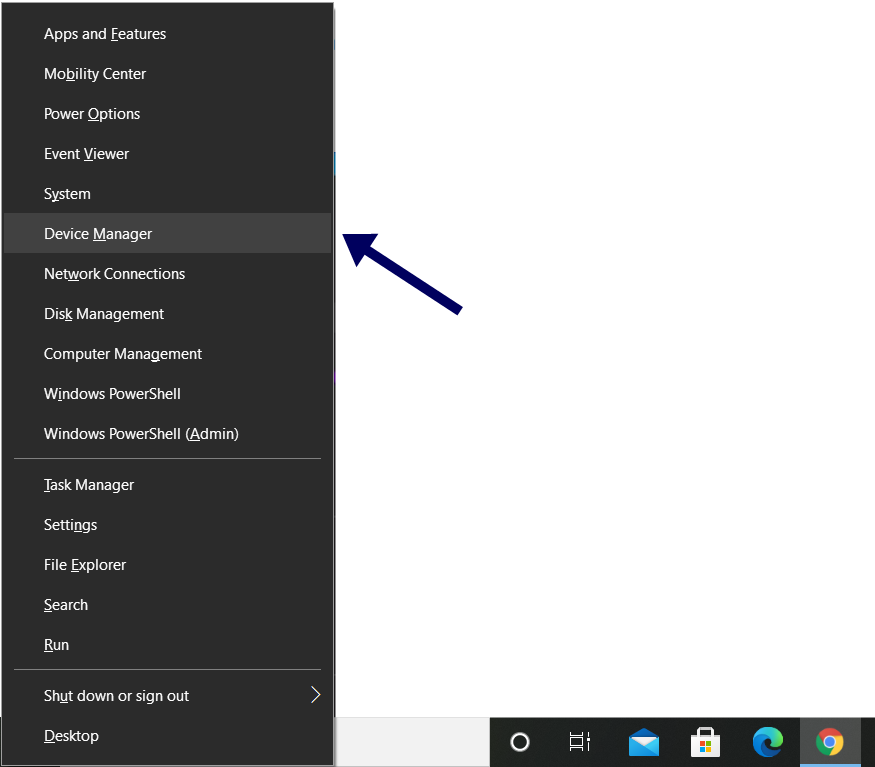
Step 2: Expand ‘network adapters’ in the device manager window. Double click on the network adapters to open its properties.

Step 3: Switch to the ‘power management’ tab and uncheck the ‘Allow the computer to turn off this device to save power’ option. And finally, click on OK.
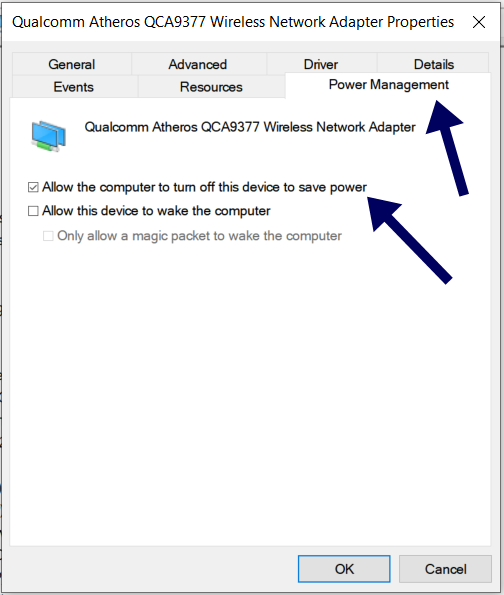
Now go ahead and check if you are getting a stable Wi-Fi connection or not.
4. Update Network Adapters
If your network adapter is outdated or corrupted then it could well be the reason behind your Wi-Fi disconnecting issue. Thus you can try updating your network drivers. So follow the steps below to fix the issue.
Step 1:Press Windows key + X and select Device Manager from the menu.
Step 2: Expand ‘Network adapters’ in the device manager window, right-click on your network adapter, and select ‘Update driver’.
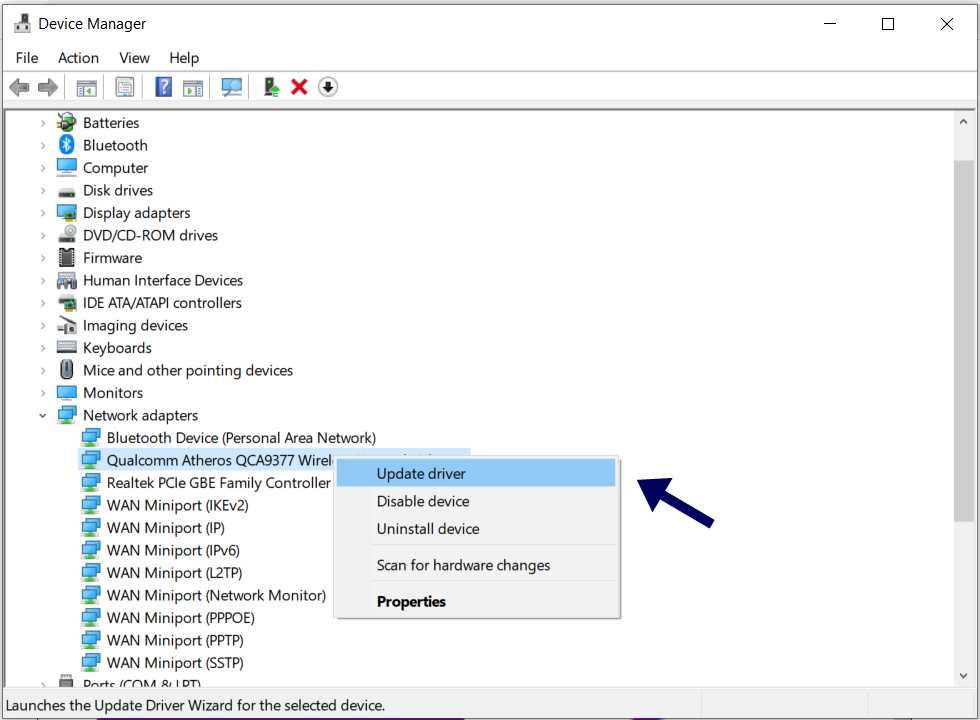
Step 3: Next, click on ‘Search automatically for drivers’ and let Windows update the drivers for you automatically.

After completion of the network driver’s update, reboot your system and check if the issue is resolved or not.
5. Reset Wi-Fi Autoconfig Service
WLAN AutoConfig is the service that is responsible for connecting your system with the router. If this service will run into the problem then it may cause the problem of Wi-Fi Keeps Disconnecting on Windows 10. To get rid of the issue you can try setting up the WLAN AutoConfig service to run automatically at startup.
Step 1: Press Windows + R to open the run window. Type services.msc in the box and hit enter.

Step 2: In the new window, locate the WLAN AutoConfig service, right-click on it, and select Properties.

Step 3: Change the startup type to ‘Automatic’ and click on Apply followed by OK.

Restart your PC to check if you are able to solve the issue of Wi-Fi disconnecting on windows 10.
6. Try Network Reset
If the above solutions won’t help you then you can try resetting the network on windows 10. By executing this process will reinstall all required network adaptersthat have been configured on your device and reset the network settings to default.
Step 1: Press Windows key + I to open Settings and go to Network & Internet.

Step 2: Go to the Status on the left sidebar, then click on the Network reset option.

Step 3: Now, click on the ‘Reset now’ button to start resetting your network.
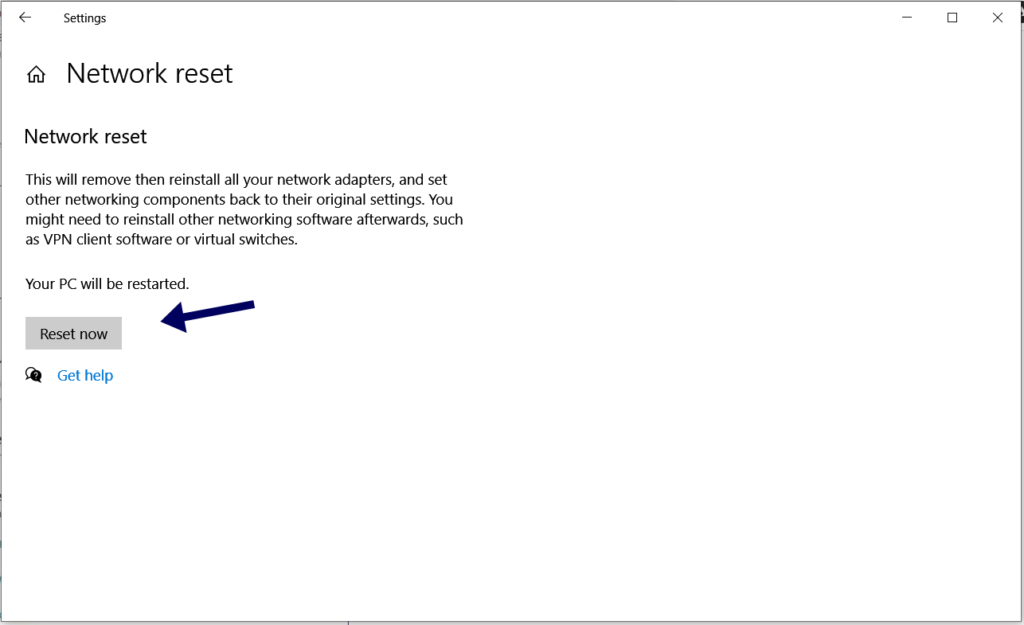
After execution of this, you need to connect to your Wi-Fi again, as after resetting it’ll forget all the old remembered networks.
7. Run Network Troubleshooter
All windows come with a network troubleshooter that can detect the Wi-Fi related issue and fix the same automatically. Follow the steps below to get started with the fix.
Step 1: Press Windows key + I to open Settings and go to Update & Security.

Step 2: Now click on the Troubleshoot on the left tab, and one by one click on Internet Connections, Incoming Connections, and Network Adapter.

Running these troubleshooters will detect if there is any system-level issue and solve it.
8. Reset TCP/IP Configuration
If all the above processes won’t work for you, then you can try resetting theTCP/IP settings on your system. Follow the steps below to resetTCP/IP and fix Wi-Fi Keeps Disconnecting on Windows 10 issue.
Step 1: Open the Start menu, type in the command prompt, and right-click on the command prompt, and click on Run as administrator.

Step 2: Type all the mentioned commands below one by one and hit Enter.
netsh winsock resetnetsh int ip resetipconfig /releaseipconfig /renewipconfig /flushdnsAlright, now restart your system to check if the issue of Wi-Fi Keeps Disconnecting on Windows 10 is resolved or not.
Wrap up
Wi-Fi Keeps Disconnecting issue is one of the worst things while working or consuming content. I Hope all the solutions mentioned above to solve the issue Wi-Fi Keeps Disconnecting on Windows 10 have been helpful for you, and you are connected to the internet as before.


