With the release of Windows 11, Microsoft added support to Android Apps. But it comes with Amazon Appstore by default, but unfortunately, Amazon Appstore does not offer a lot of apps at the moment. So to get access to a lot of apps I’m writing this article on How to Install Google Play Store on Windows 11.
After reading this article you’ll learn the way to Install Google Play Store on Windows Subsystem for Android (WSA) to make it easier to install the android apps on Windows 11 system. After installing Google Play Store on Windows 11 you’ll be able to install the android apps to your Windows 11 system as you do on your Android devices.
Note: Please make sure to uninstall WSA before proceeding, if you’ve already installed WSA before reading this guide.
Alright, so without any further ado let’s jump right into the process of installing the Google Play Store on Windows 11.
Contents
1. Uninstall Windows Subsystem for Android(WSA)
So the first step towards installing Google Play Store on Windows 11 is to uninstall the (WSA)WindowsSubsystem for Android. Because The Google Play Store support is not available in the older version of Windows Subsystem for Android.
To uninstall the Windows Subsystem for Android follow the steps below.
Step 1: Click on the start button and search for ‘Windows Subsystem for Android‘.
Step 2: Right-click onWindows Subsystem for Android (WSA) and click on uninstall.
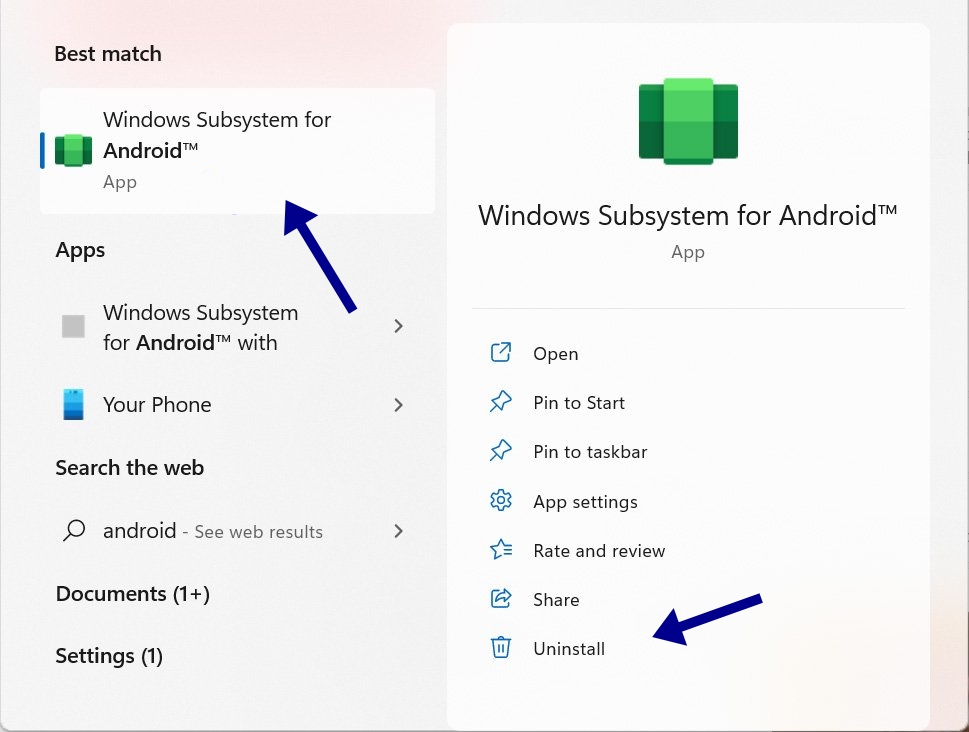
once you’ve uninstalled (WSA) all the installed app will be gone.
2. Turn on the Developer Mode
After uninstalling the older version ofWindows Subsystem for Android (WSA) you need to turn on the developer mode.
Follow the steps below toTurn on the Developer Mode in Windows 11.
Step 1: Click on the Windows icon, then click on Settings.

Step 2: Select ‘Privacy & Security‘ from the left pane.
Step 3: Then on the right side select the options ‘For Developers‘.

Step 4: Now simply locate the ‘Developer Mode‘ section, and turn on the toggle button.

3. Download Windows Subsystem for Android Package/Kernel File
Now in the next step, you’ve to Download Windows Subsystem for the Android package (WSA). Again, please make sure to download and use the same Package file which I have shared below.
Alright, After downloading the package extract the same into a new folder.

The next step is to download the Kernel file, which I have shared below.
Now, follow the steps carefully
Step 1: Browse to theWindows Subsystem for Android (WSA) folder that you have extracted.
Step 2: Open the ‘Tools‘ folder under that.
Step 3: On the tools folder,paste the kernel file that you have downloaded.

4. Install Windows Subsystem for Android
Once you’ve followed the above steps it’s time to install the Windows Subsystem for Android (WSA). To install it you need to carefully follow the steps below.
Step 1: Search for ‘Powershell‘ in Windows 11 Search.
Step 2: Right-click on Powershell and select ‘Run as administrator‘.
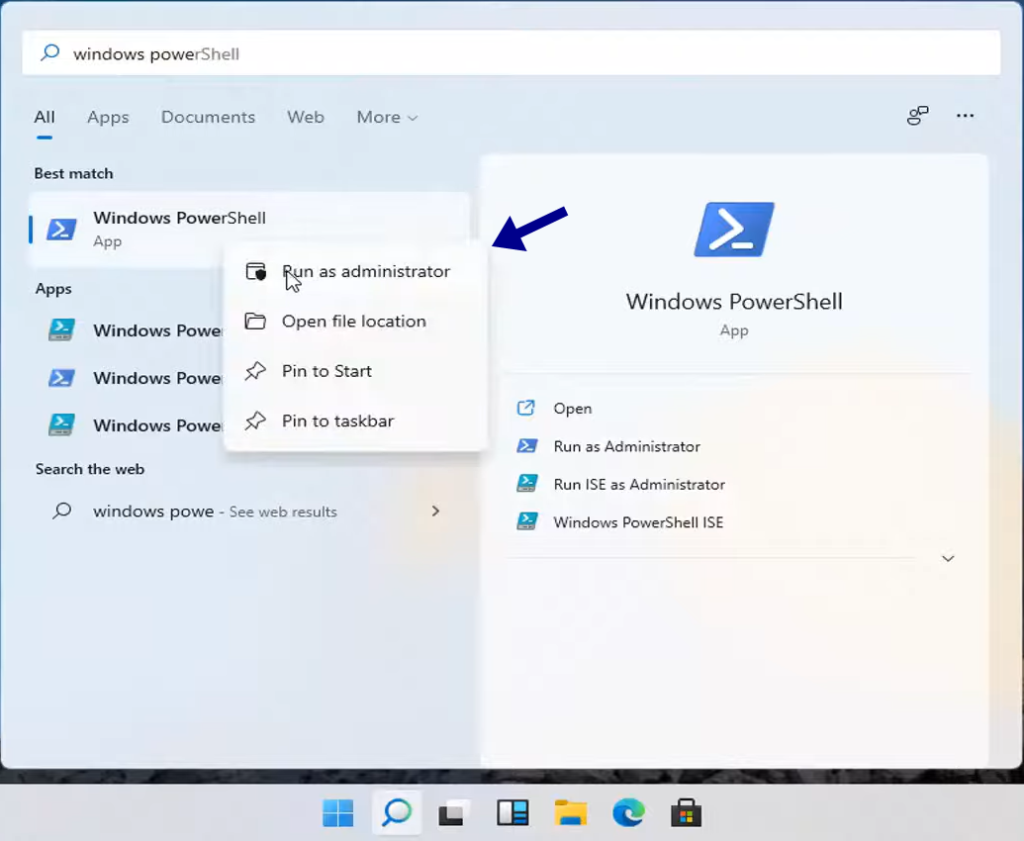
Step 3: On the Powershell Window, enter the ‘cd‘ command followed by the extracted WSA folder location.
cd "C:\User\hoppingeek\Location of the extracted WSA folder"Note: Replace ‘Location of the extracted WSA Folder’ with your actual folder location.
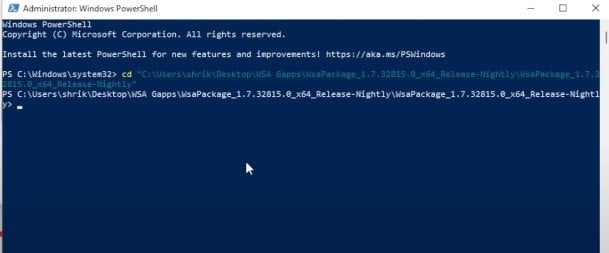
Now, Execute the below command on the PowerShell.
Add-AppxPackage -Register .\AppxManifest.xml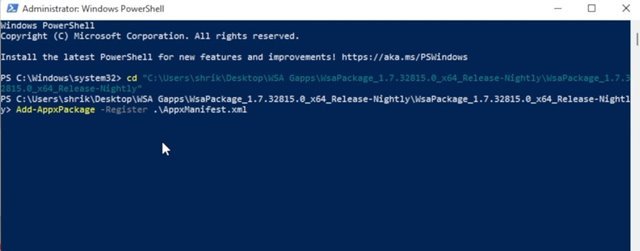
That’s it, Now this will install the Windows Subsystem for Android (WSA) on your Windows 11 system.
5. Enable Developer Mode in WSA
Then, the next step is to Enable ‘Developer Mode’ in WSA. For that follow the stepsmentioned below.
Step 1: Search for ‘Windows Subsystem for Android‘ on Windows 11 Search box.
Step 2: Then simply openWindows Subsystem for Android (WSA) from the list.
Step 3: Now, you need to enable the ‘Developer Mode‘ option. As shown in the screenshot.

Step 4: Next, click on the ‘Files‘ button, as shown in the screenshot.

Now a diagnostic pop-up will come, on that click on the ‘continue‘ button.
6. Time to Install Google Play Store
Now, I’ve come to the end of this guide. Hre you have to tweak some things to Install Google Play Store on Windows 11. So, as always follow the steps mentioned below.
Step 1: Navigate to the ‘C:\adb\platform‘ tools folder.
Step 2: Next, on the File Explorer address bar, type in ‘CMD‘ and hit Enter button.

Step 3: Now command prompt will open, type ‘ADB connect‘ and your ‘localhost address‘ and hit enter. Check the example below.
adb connect 127.18.155.80:585Note: Make sure to replace ‘127.18.155.80:585’ with your Localhost address.
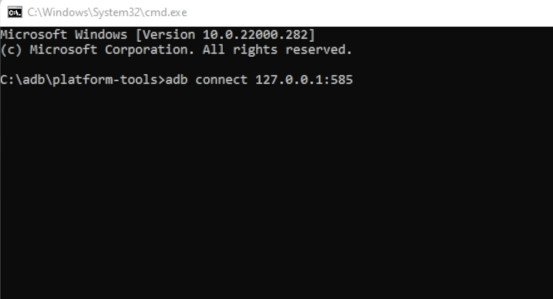
If you don’t know your system’s localhost address, you can find it in the Settings of Windows Subsystem for Android (WSA).
Step 4: Next, type in ‘ADB shell‘ on the Command Prompt and hit Enter button.

Step 5: Type in ‘su‘ and hit enter.

Step 6: Now you need to type in ‘setenforce 0‘ and hit Enter.

7. Accessing the Google Play Store
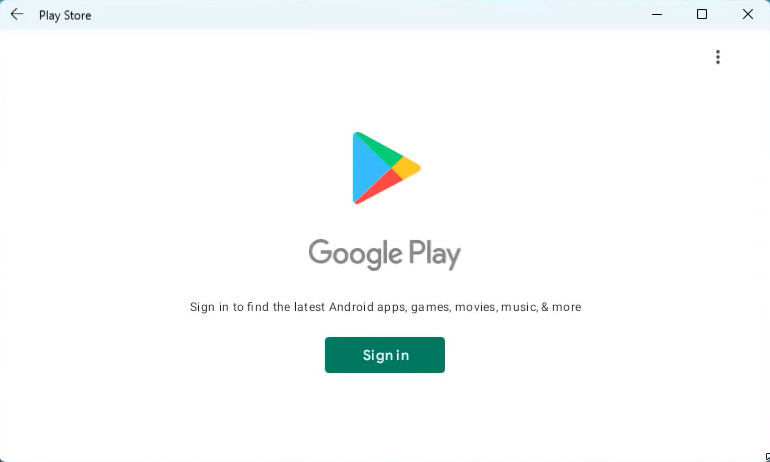
If you have followed the above steps carefully, you have successfully installed Google Play Store on Windows 11, and will be up and running. To open Google Play Store go to the start menu and click on the Google Play Store icon.

Once you click on the Google Play Store icon it will ask you to sign in, after signing in with your Google account you can install the apps directly from the play store to your Windows 11 system, similarly you do for your android devices.
Also Read: Reset Network Settings in Windows 11
Wrap up
That’s all you are done, with installing the Android subsystem with Google Play Store on Windows 11. The process shown above is the way by which you can Install Google Play Store on Windows 11. Hope this article will help you in the installation of the Google Play Store on Windows 11. If you like this article please share it with your network. If you like my previous articles please do follow me on social media.


