As you know that Microsoft has launched their new Windows 11, with lots of new cool features and updates to the old ones. But still, Windows 11 retains some of the old quirks from windows 10. One of those is automatic updates.
The worst thing about that, Microsoft doesn’t give the user the straightforward way or any option to disable automatic updates on windows 11 & windows 10. So if you are looking at how to disable automatic updates in windows 11, then here I’m going to guide you step by step way to prevent windows 11 automatic updates from day one.
1. Disable Windows 11 Update Service
One way to disable Windows 11 automatic updates is by disabling the Windows update service. To do that follow the steps below.
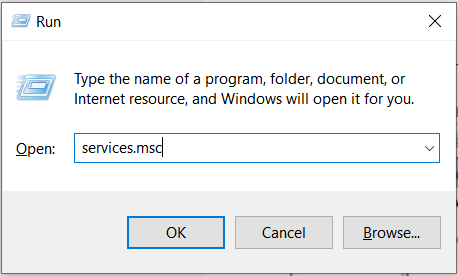
Step 1: Open ‘Run’ by pressing the ‘Windows + R’ key, then type ‘services.msc‘ and hit enter.
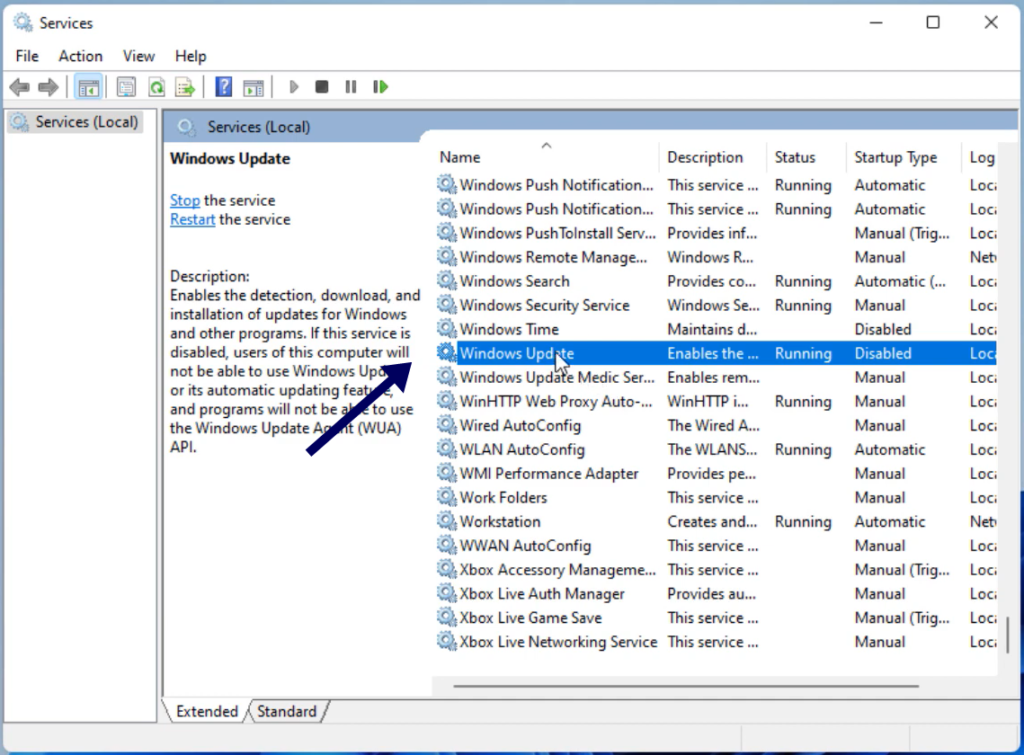
Step 2: This will open the ‘services’ window scroll down to the bottom and find for ‘Windows Update’ double click on that, which will open the properties window.
Step 3: On the properties window, go to the ‘General’ tab. Now in the ‘startup type’ select ‘Disabled’ from the dropdown menu. Click on ‘Apply’ followed by ‘Ok’ to save the settings.
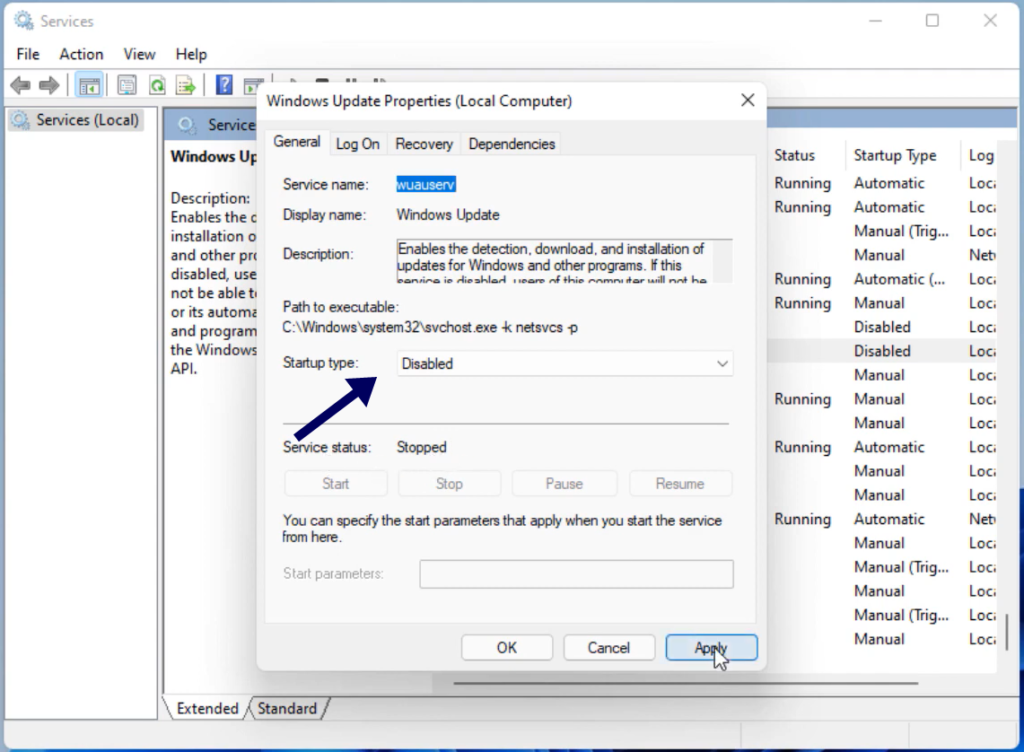
That’s it. From now your Windows 11 system will no longer update automatically. If you want to re-enable the automatic updates for Windows 11 system then you can come back again and change the ‘startup type’ to ‘Automatic’.
2. Using Registry Editor Stop Windows 11 Automatic Updates
Another way to disable Windows 11 automatic updates is by tweaking the registry file, follow the steps below to execute the same.
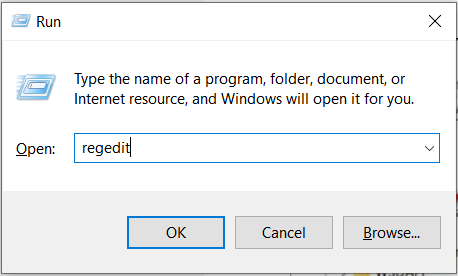
Step 1: Open Registry editor, to do that press (Windows + R) and type as ‘Regedit’ and hit enter.
Step 2: In the Registry Editor window, use the left sidebar to navigate to the following location:
HKEY_LOCAL_MACHINE\SOFTWARE\Policies\Microsoft\WindowsStep 3: Then check for a key called ‘WindowsUpdate’ already exists in the ‘Windows’ folder. If yes, go to the next step.
If not create the new key here and name it ‘WindowsUpdate’. To create, right-click on the ‘Windows’ folder and then select ‘New > Key’.
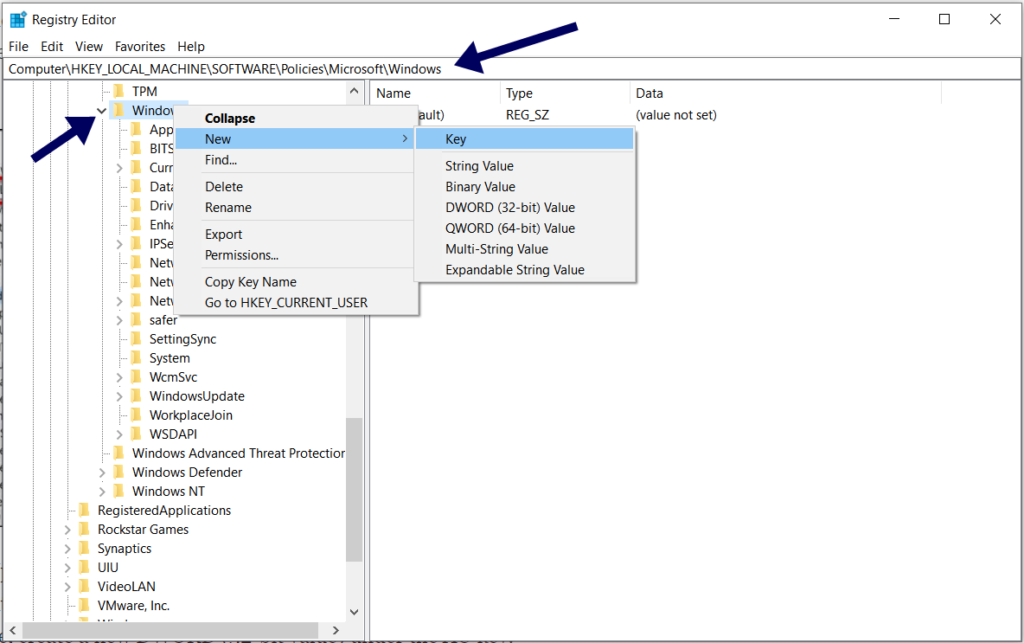
Step 4: If the ‘WindowsUpdate’ key was already present, you might find a key called ‘AU’ in the folder.
If not present, create a new one under ‘WindowsUpdate’ and name as ‘AU’ In either case, create a new DWORD (32-bit value) under the AU key.
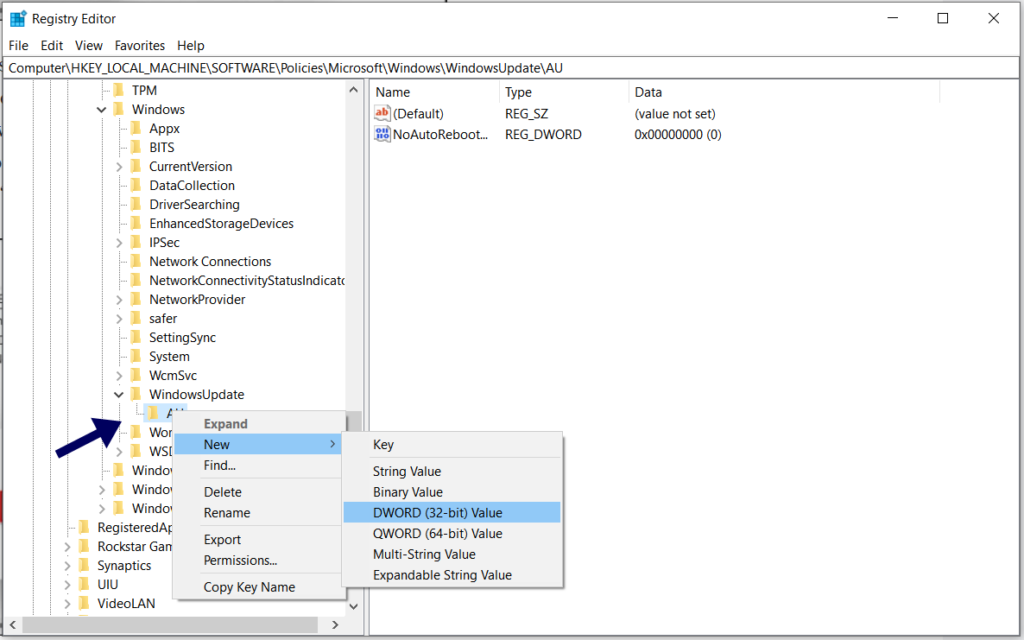
Step 5: To do that right-click on the ‘AU’ on the right sidebar and select ‘New > DWORD (32-bit) value’. name the entry ‘NoAutoUpdate’ (Without quotes).
Step 6: Now double click on the newly created DWORD file and change the value from ‘0’ to ‘1’ and click on Ok to save the changes.
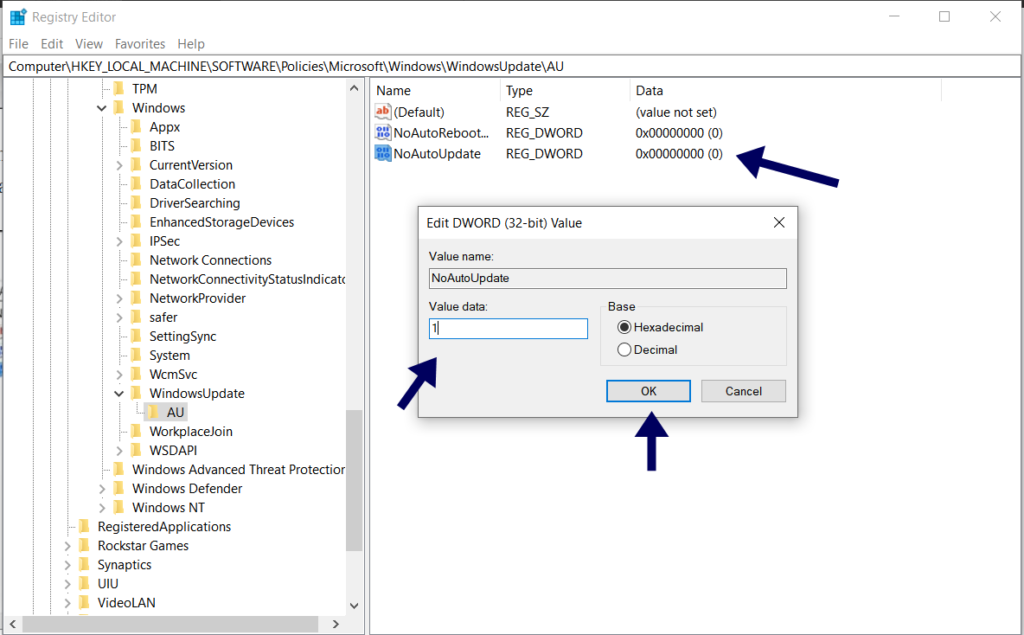
That’s it. This change will come into effect once you’ll restart your system. After that, it will successfully disable automatic updates on Windows 11.
3. Disable Automatic Updates on Windows 11 Using Group Policy
Step 1: Open the Local Group Policy Editor on your system. To do that, open the ‘Run’ dialog by pressing the ‘Windows + R’ key together. And type ‘gpedit.msc‘ and hit enter to open the Group Policy Editor.
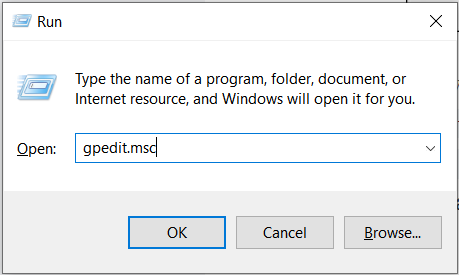
Step 2: In the Group Policy Editor window. browse to the path given below, using the left sidebar.
Computer Configuration > Administrative Templates > Windows Components > Windows Update > Manage end user experienceStep 3: Once you’ve browsed through the path, on the right pane double-click on the entry that says ‘Configure Automatic Updates’.
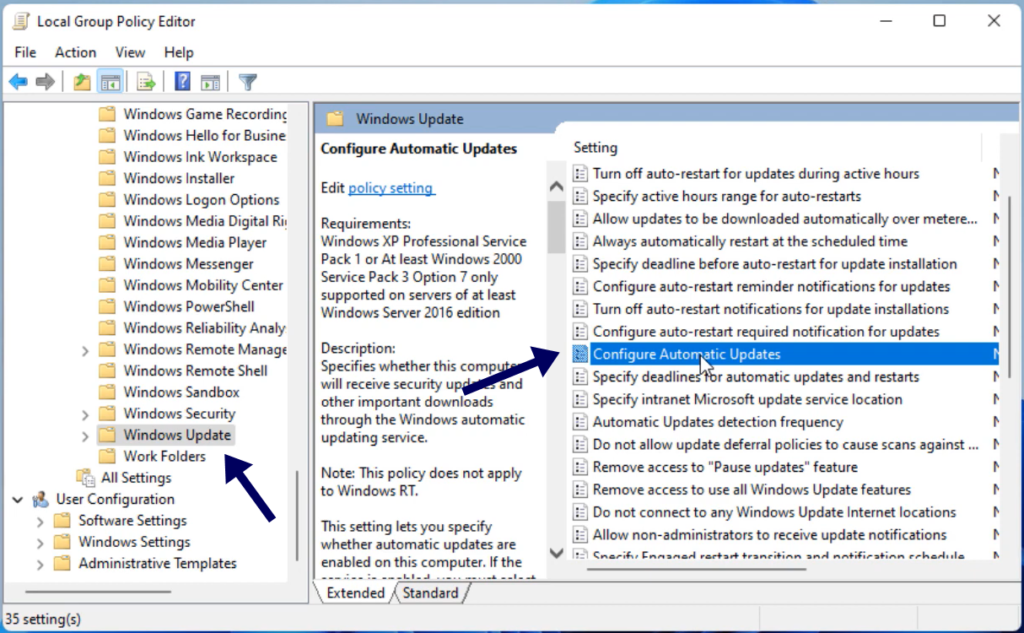
Step 4: On the configuration page, select ‘Disabled’ and click on ‘Apply’ followed by ‘Ok’ to save the preferences. This option will disable automatic updates on Windows 11.
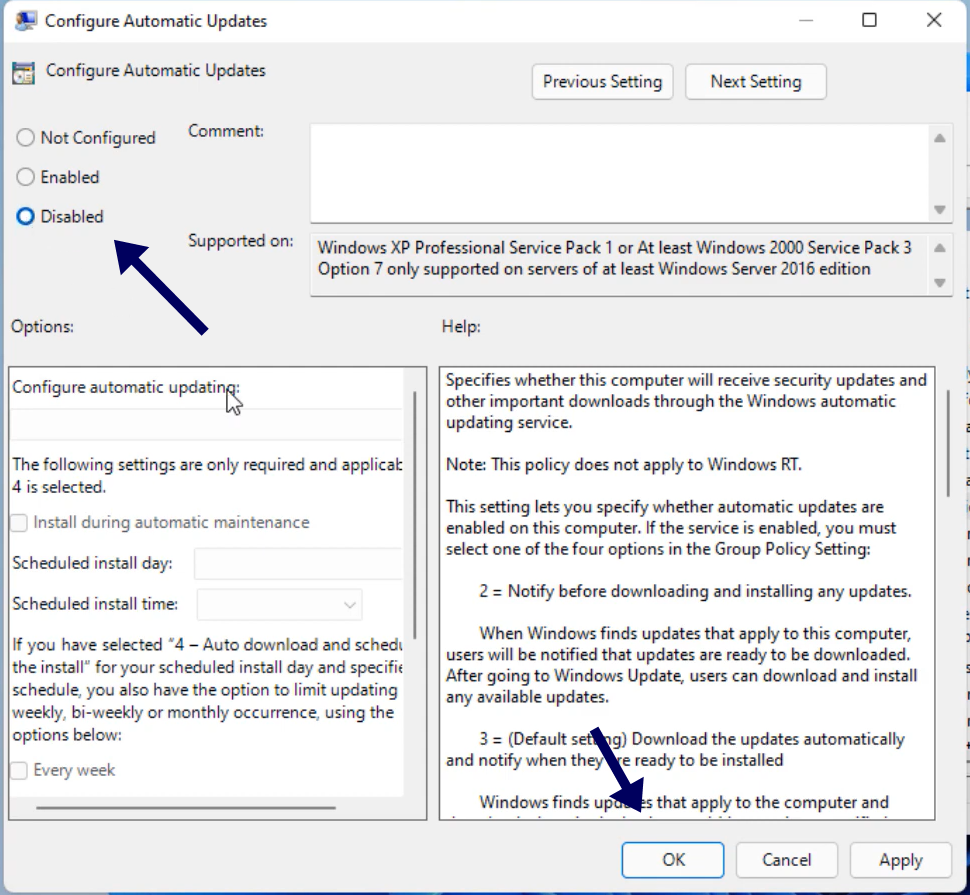
Note: When you set the status of this policy as ‘Disabled’, any update available for your system will be downloaded and installed manually.
4. Use Windows Update Blocker Utility Tool
Along with the inbuilt method to you can also use a third-party application called ‘Windows Update Blocker’ to disable Automatic Updates on Windows 11. This program is originally coded for Windows 10 but the application works perfectly with Windows 11 as well.
It offers a one-click solution to block windows updates. I think this is one of the convenient options to enable and disable Windows 11 Automatic updates installation.
Step 1: Download the ‘Windows Update Blocker’ utility tool from here, on your Windows 11 machine.
Step 2: Extract it using any file extracting tools like WinRar or WinZip.
Step 3: Once you’ve extracted the file to your system, open the application.
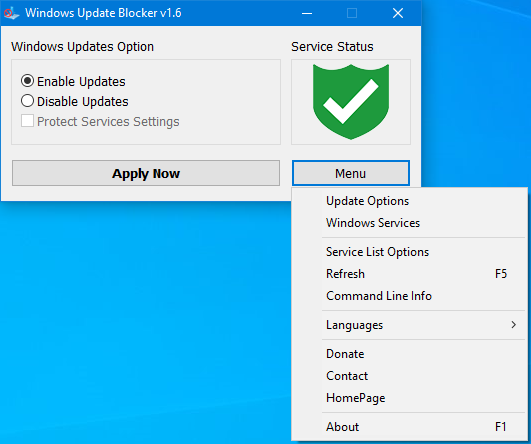
Step 4: Now select ‘Disable Updates’ and ‘Protect Services Settings’ and click on ‘Apply Now’.
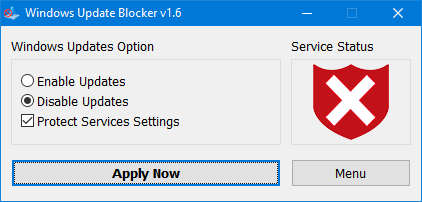
if the ‘Service Status’ icon turns ‘red’ that means that you have successfully blocked the windows update service.
If you want to re-enable the automatic updates then go to the application and select ‘Enable Updates’ then click on ‘Apply Now’.
This Awesome video by DreamWebTuts on How to Disable Automatic Updates on Windows 11.
Disable Automatic Updates on Windows 11
Automatic updates of the windows machine are painful for windows users because it consumes lots of data and starts downloading the latest updates without the user’s concern on the other hand it takes away the options from the users. Hope the article about How Disable Automatic Updates on Windows 11, will help you to stop automatic updates on windows 11.


